


Description
Designed for the self-employed & “one-man-band” operations, as well as businesses with small or medium sized teams, the FD4Cast Google Sheets Task & Timesheet Client Manager App (Built-in Mail-Merge, WhatsApp & SMS integration) make things simple for users and ensures interaction with the end client a seamless process.
The App uses a Google Sheets back-end (so that the data is held privately in the cloud with no hosting costs) and a Google Scripting Browser front-end. All you need is a free Google account – either your existing one or one that you might want to create purely for using this App. The App allows users to:
- Add client details
-
- Create tasks / job deadlines which need to be completed for clients
- Add task to your calendar to easily track deadlines
- Record time spent doing the tasks
- Raise detailed invoices for the work done in a given period
-
- Interact seamlessly with clients from inside the App over WhatsApp / SMS to:
- Remind clients if they need to provide information for a deadline
- Promote new products / services over WhatsApp
- Send individual or bulk email to clients:
- Remind them about their task deadlines or promote a new product or service
Typical users include accountants, bookkeepers and other self-employed professionals, and also tradesman, property landlords, and “cottage-industry” small businesses.
Tasks and activity types are easily customisable to suit any business. So where an accountant would want to track upcoming task deadlines for accounts, tax filing & payroll requirements, a plumber, electrician or aircon engineer would want to record annual maintenance commitments for boilers and other installations, and a property landlord or AirBnB host would want to record contracts, deposits, cleaning, maintenance, check-in & check-out times, etc.
Tasks can be repeatable with a defined periodicity (weekly, monthly, quarterly, annual), or can be one-off. The user is always presented with a list of the most pressing tasks listed by deadline date so that there is a constant reminder of what needs to be done.
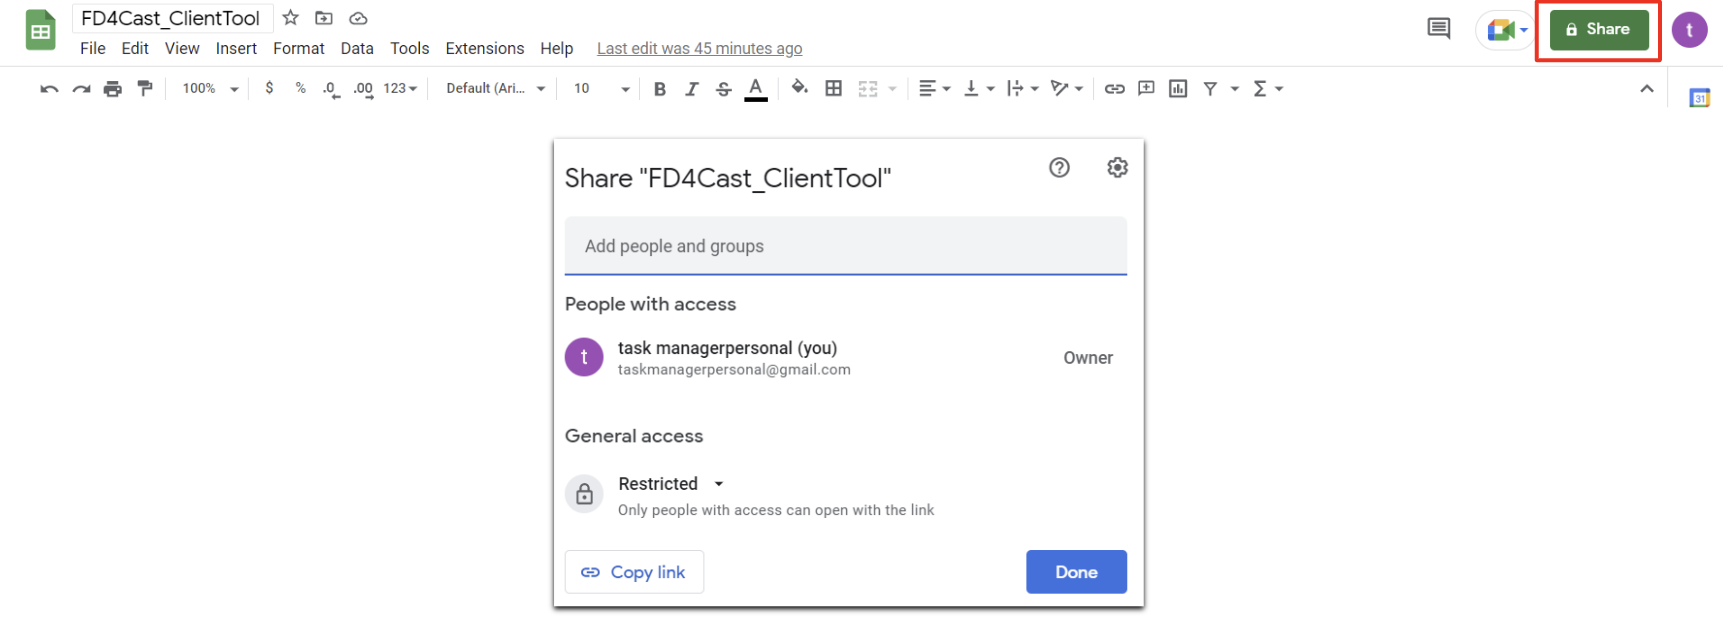
Users have a Trial Period of 30 days, after which they must purchase a license in order to continue using the App. The Trial comes in the format of a link to a Publicly-Shared Master Google Sheet, which the user must first make a copy of the public sheet into their own private Google Account.
Then there is a deployment process which the user needs to follow in order to create the secure front-end interactive browser. The method of deployment differs according to whether the user is a single-user (whereby viewing of the data is limited to just themselves) or wants to be able to share access with a selected wider team of people who will be invited to view the data and use the app by the original owner user.
A full description of how to use the App is given below, along with instructions at the end on how to deploy the Trial and create the secure front-end browser.
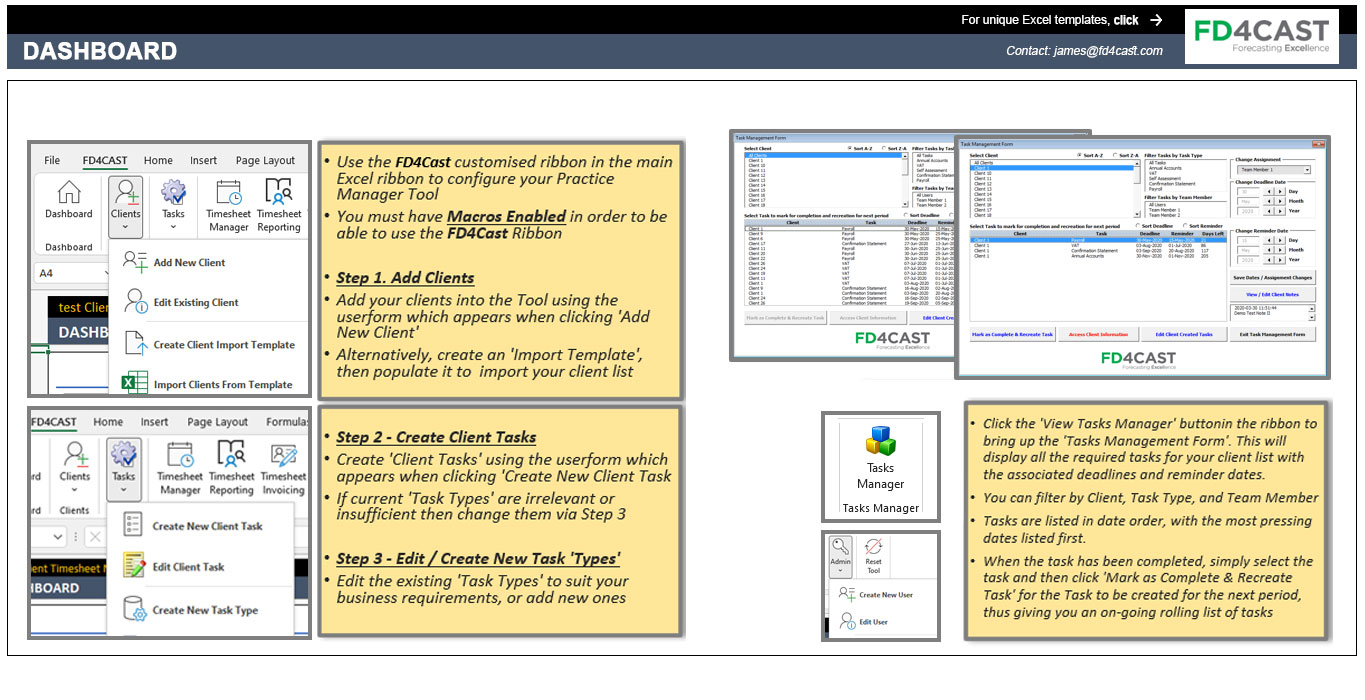
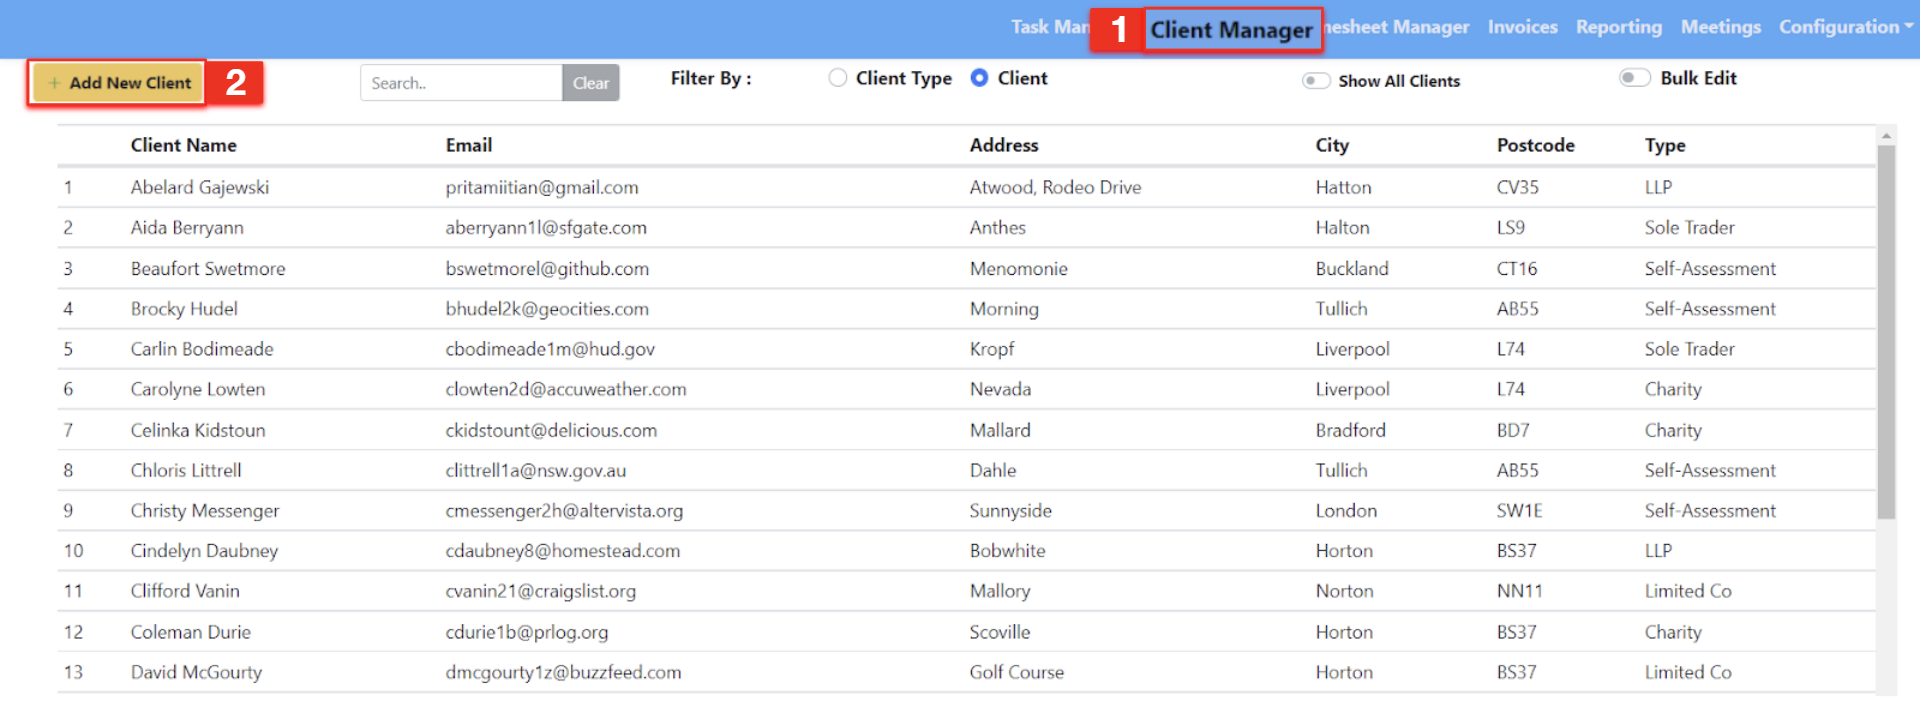
STEP 1. ADD CLIENTS:
Follow the steps in the screenshots below Client Manager > Add New Client:


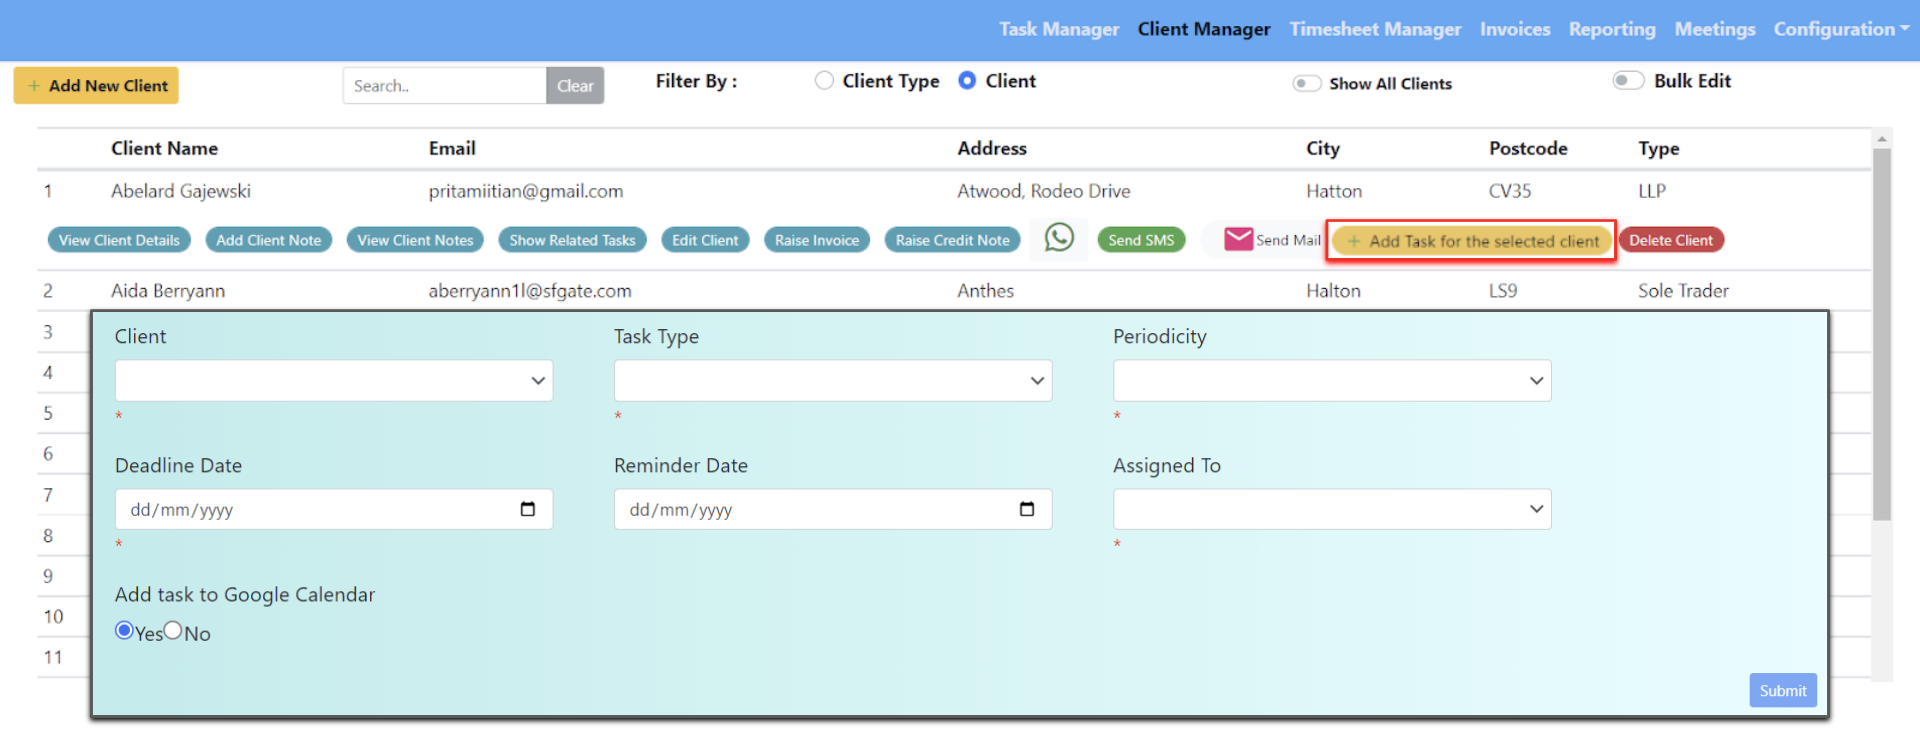
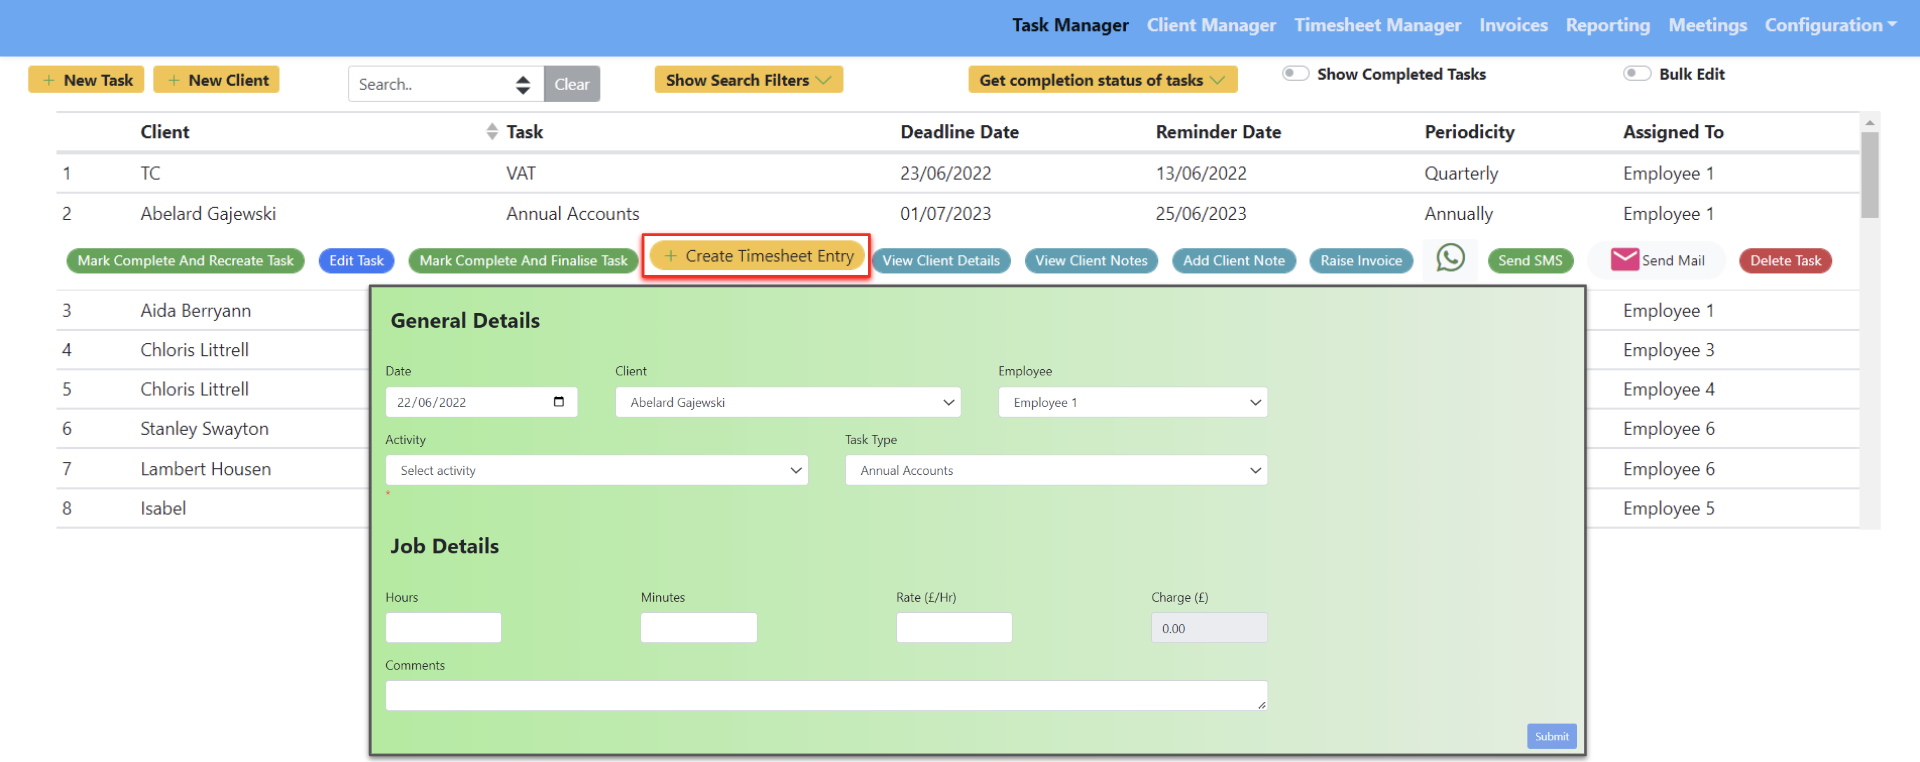
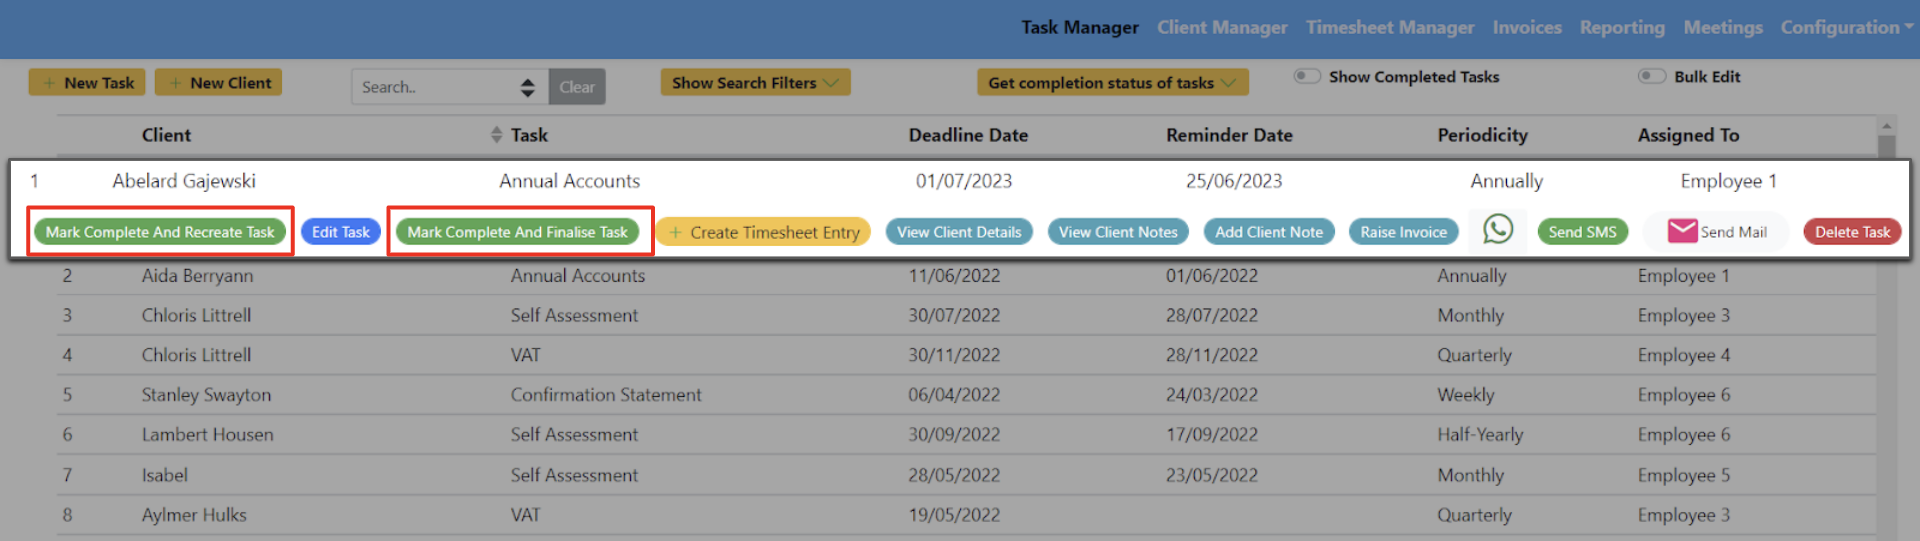
STEP 2. CREATE CLIENT TASKS:
Generate new tasks for each client, assigning a deadline, reminder date and frequency to the task and assign the task to the team member who will be responsible for completing the task:

Clicking ‘Mark Complete and Recreate Task’ will recreate the task with a new date at the appropriate position on the task manager list according to the deadline date of the task. Clicking ‘Mark Complete and Finalize Task’ will simply finalize the task and not re-create it.
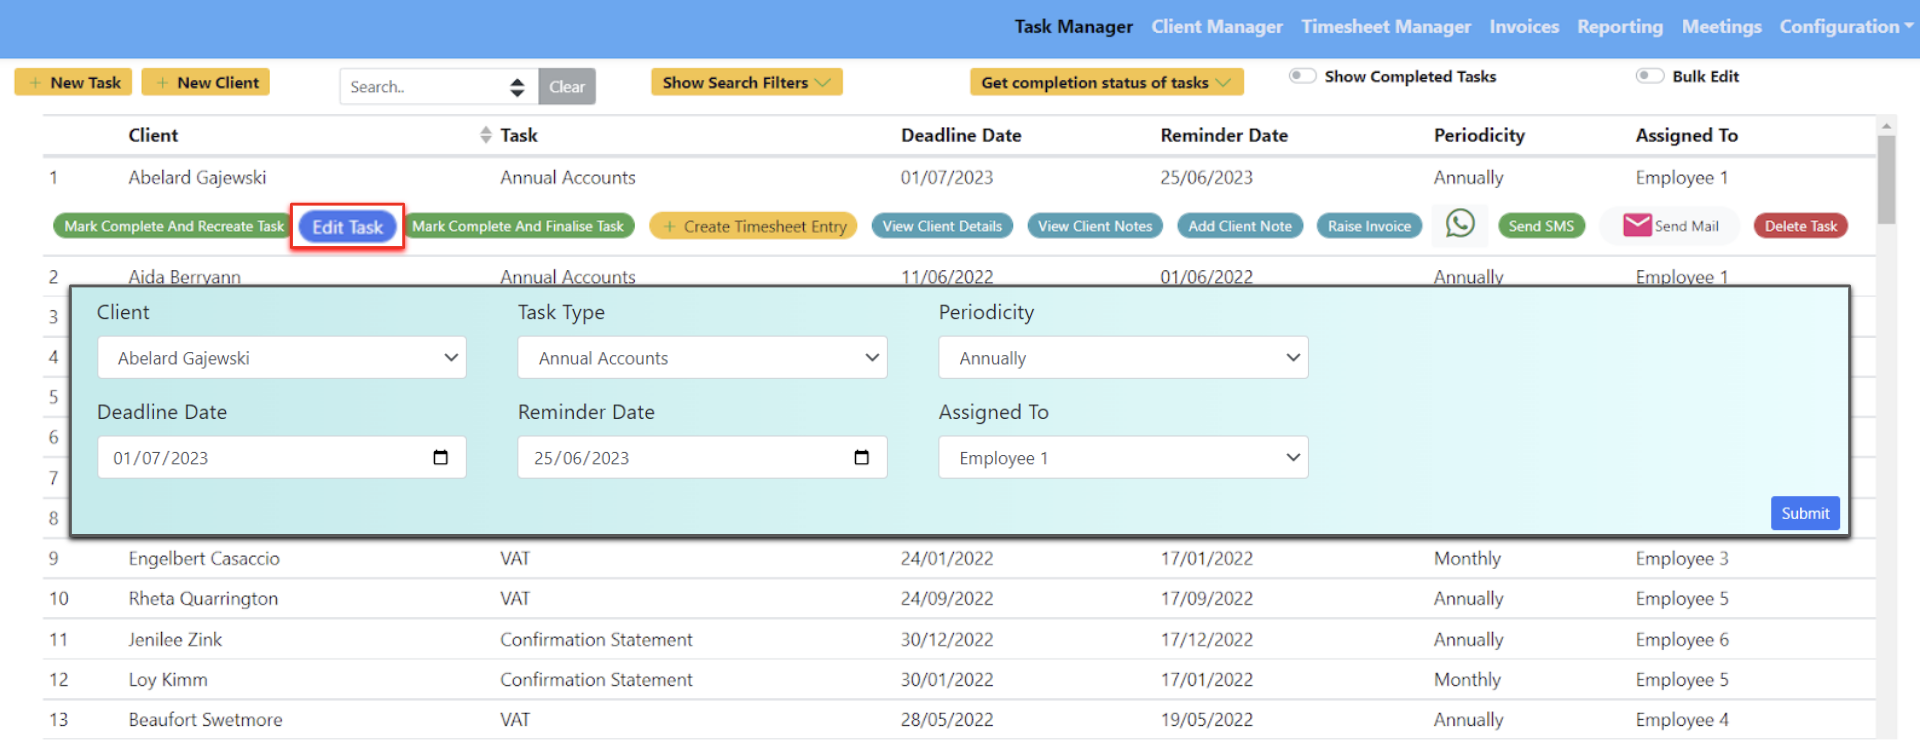
STEP 3: Edit/Create New Tasks
Create New Tasks or Edit the existing Tasks to suit the user business requirements:
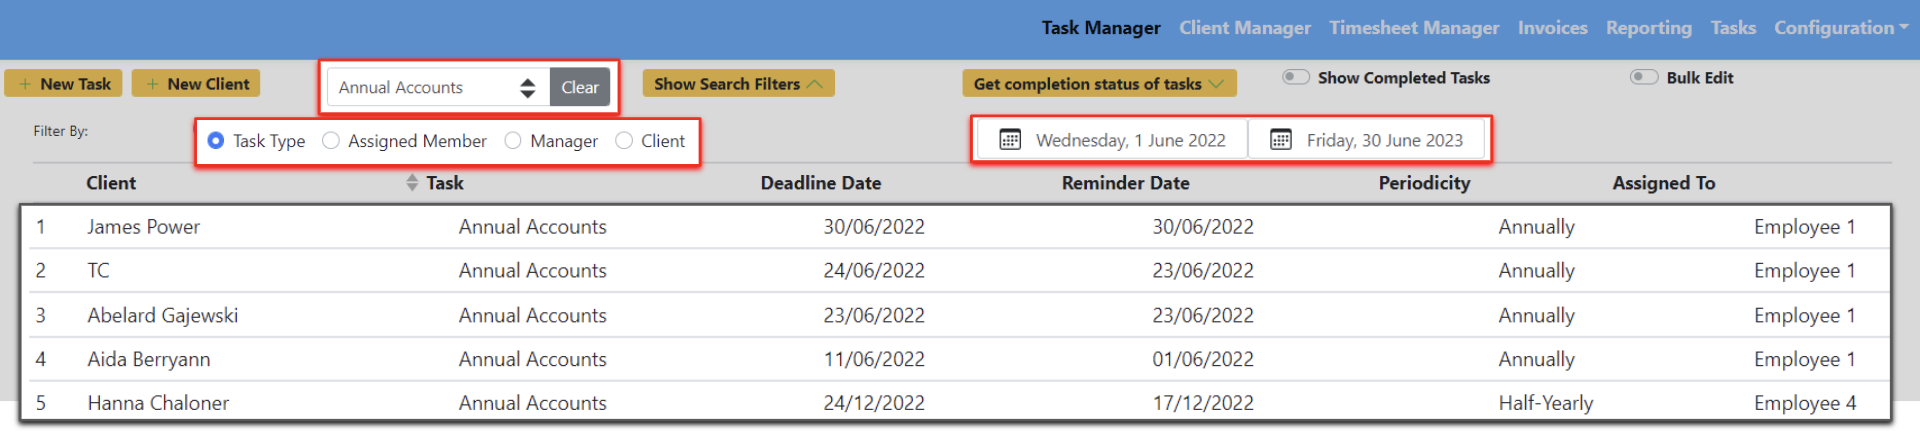
Clicking ‘Show Search Filters’ allows users to enter filters and search parameters in order to search more effectively for given tasks.
Example: Filtered by Task Types (Annual Accounts) from June 1, 2020 to June 30, 2023.
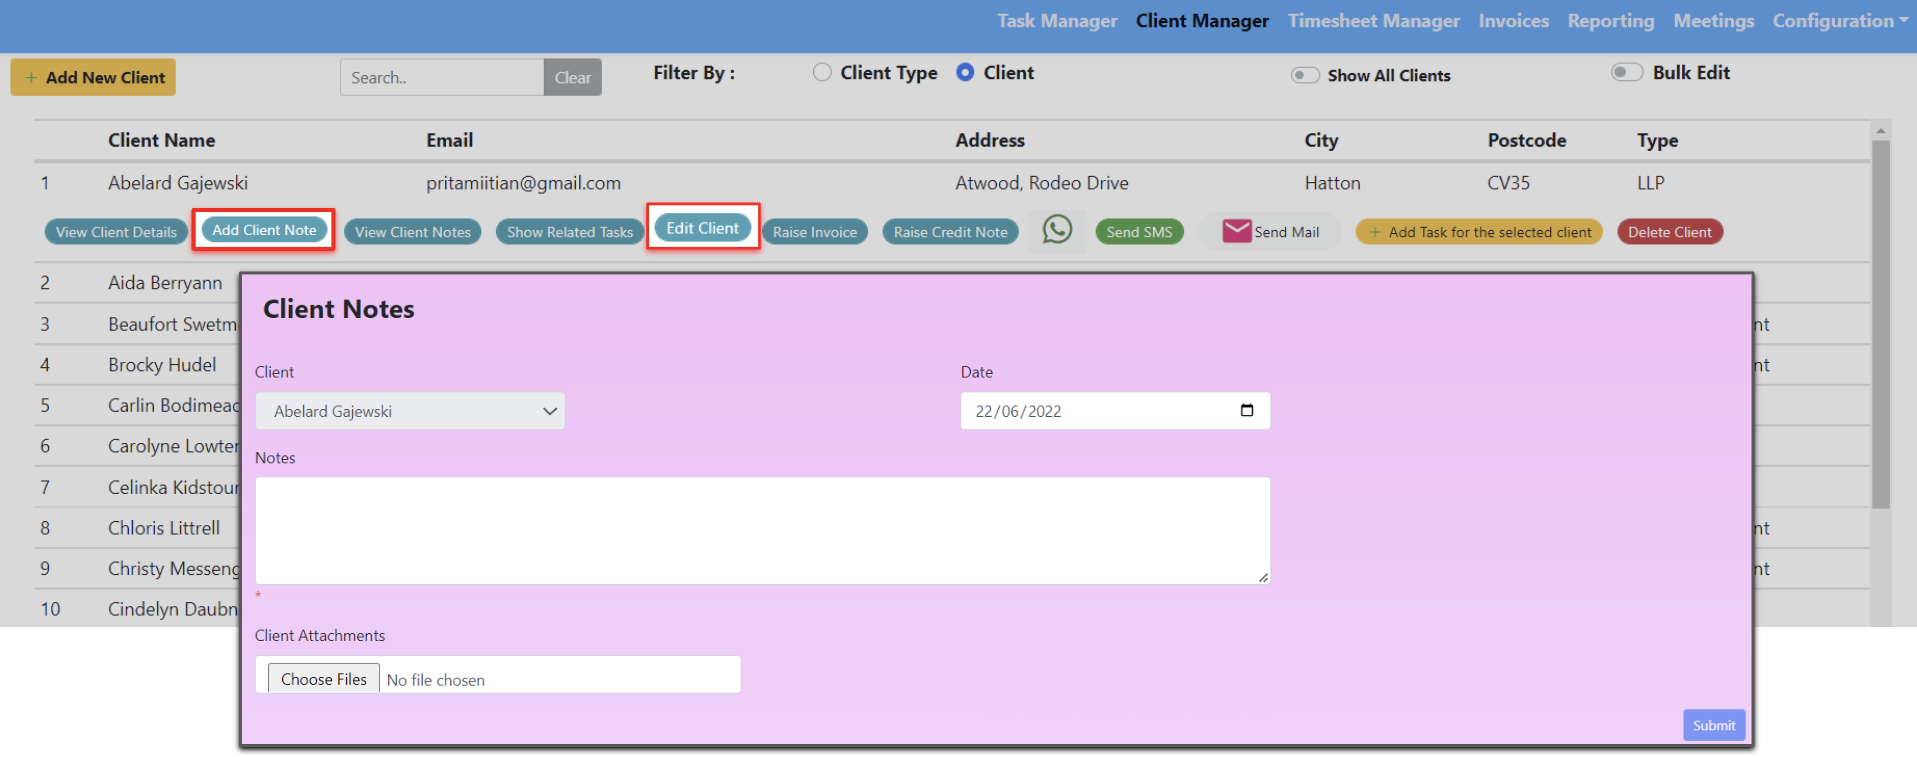
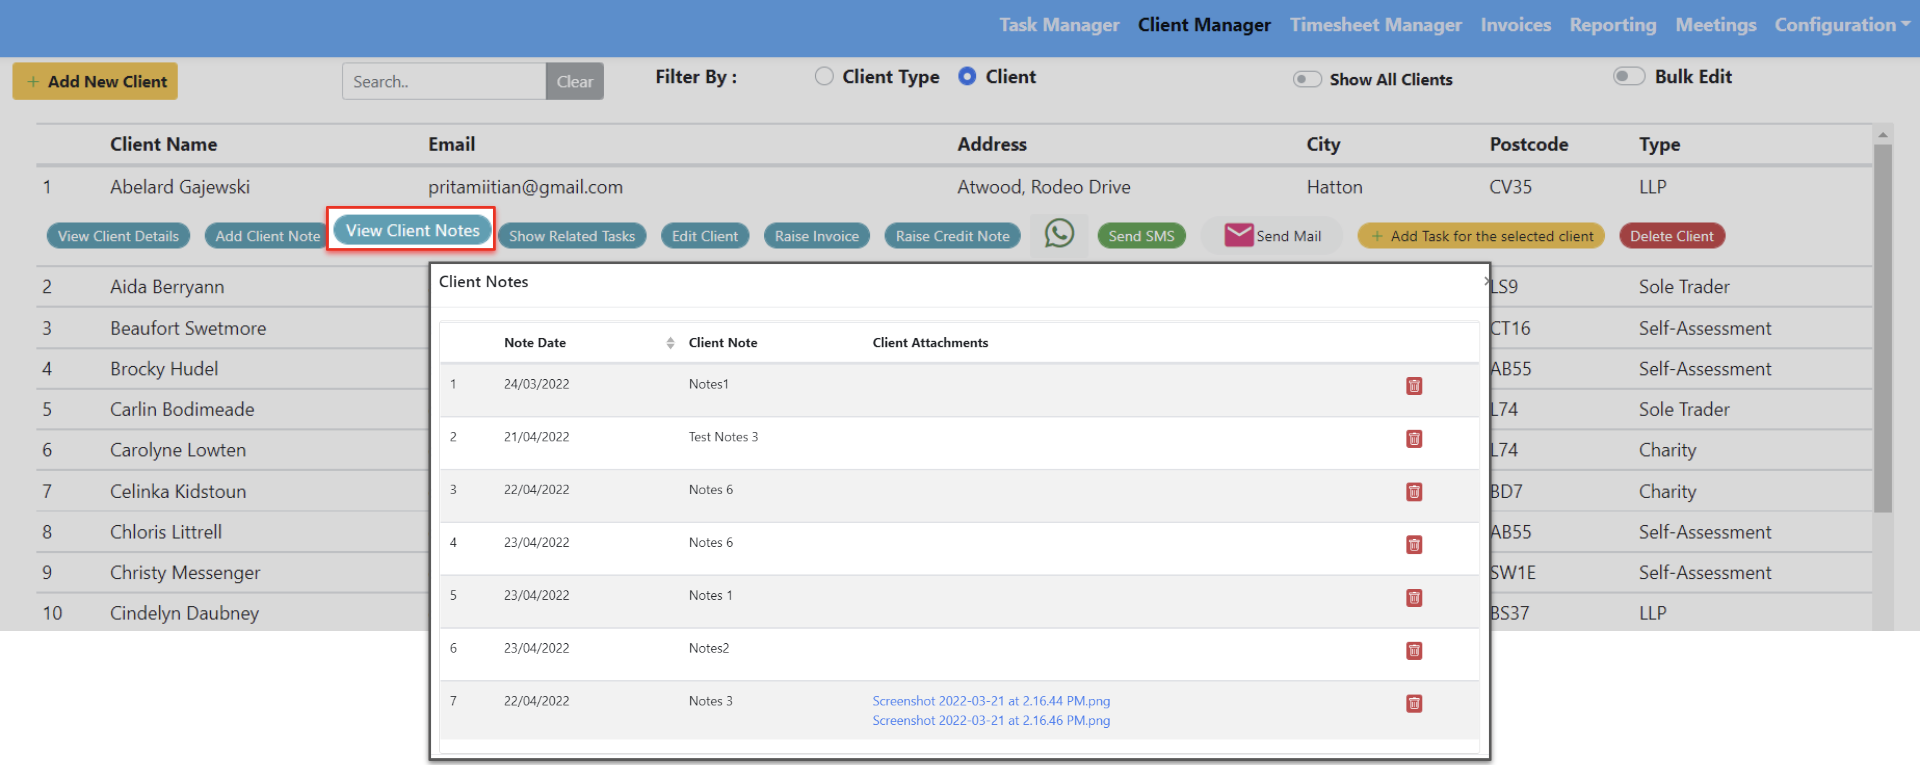
STEP 4: Create Client Notes & Upload Documents
Users can create notes for clients and upload and store relevant documents pertinent to the client.
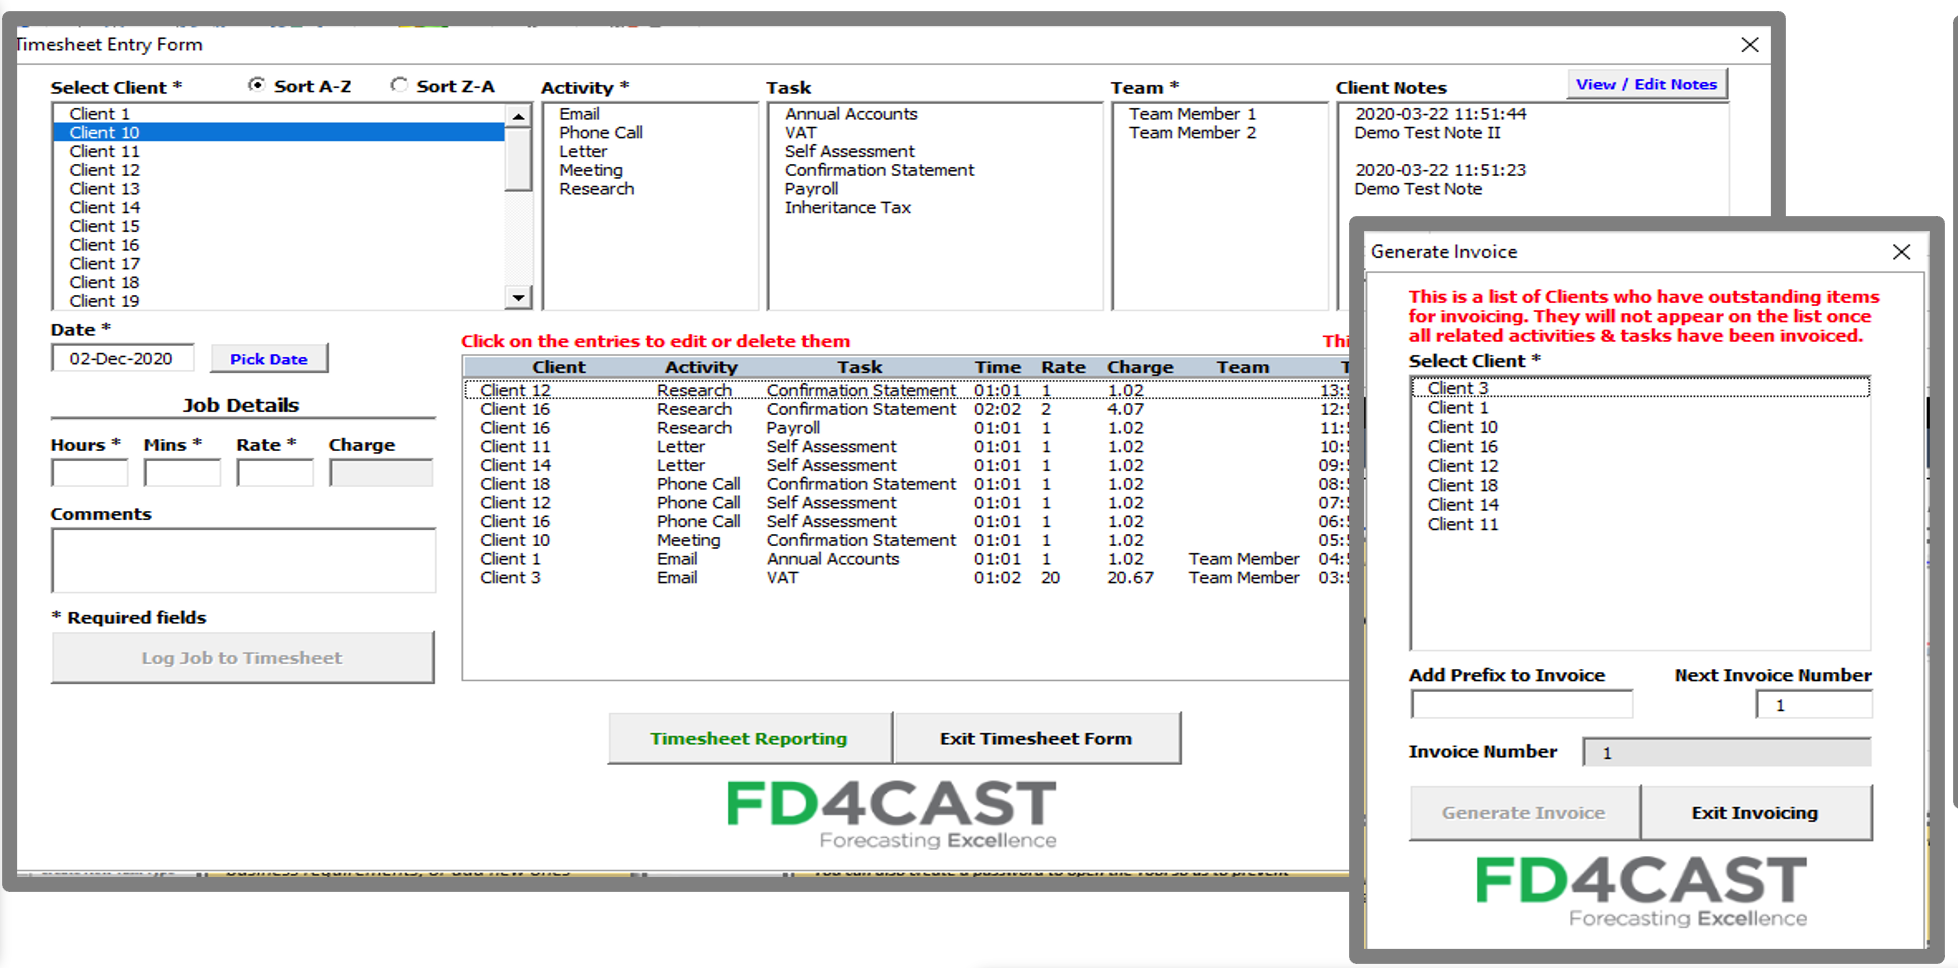
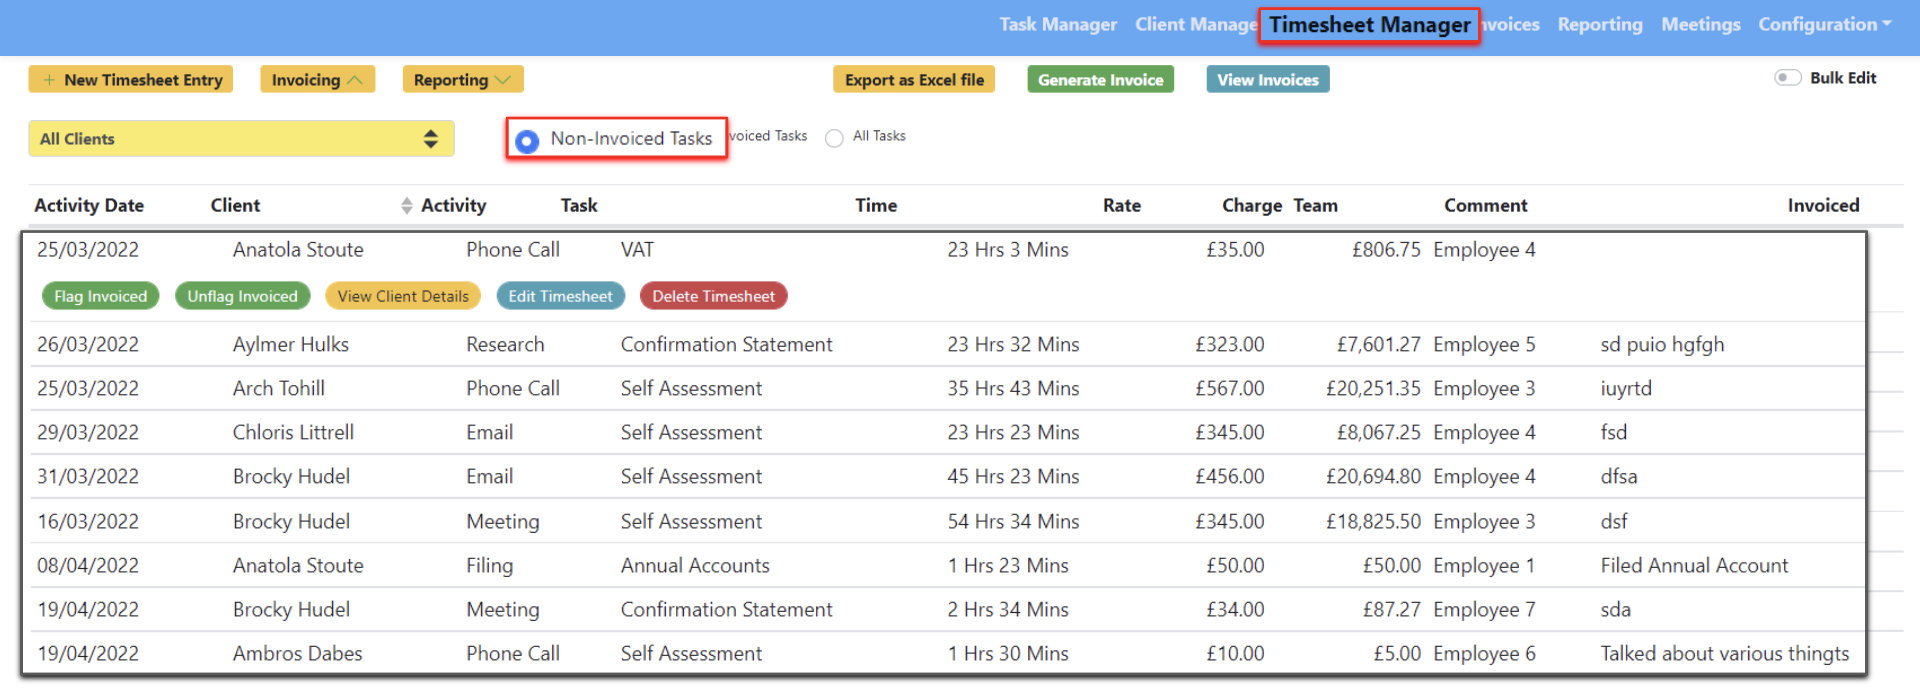
STEP 5: TIMESHEET MANAGER
Users can record time spent undertaking client tasks so that a detailed invoice can be produced for the client to show exactly which tasks were worked on and how much time was spent doing them:

In the Timesheet Manager section, the default view is for tasks yet to be invoiced, but users can also see tasks which have been invoiced and all tasks together by clicking the corresponding radio button.

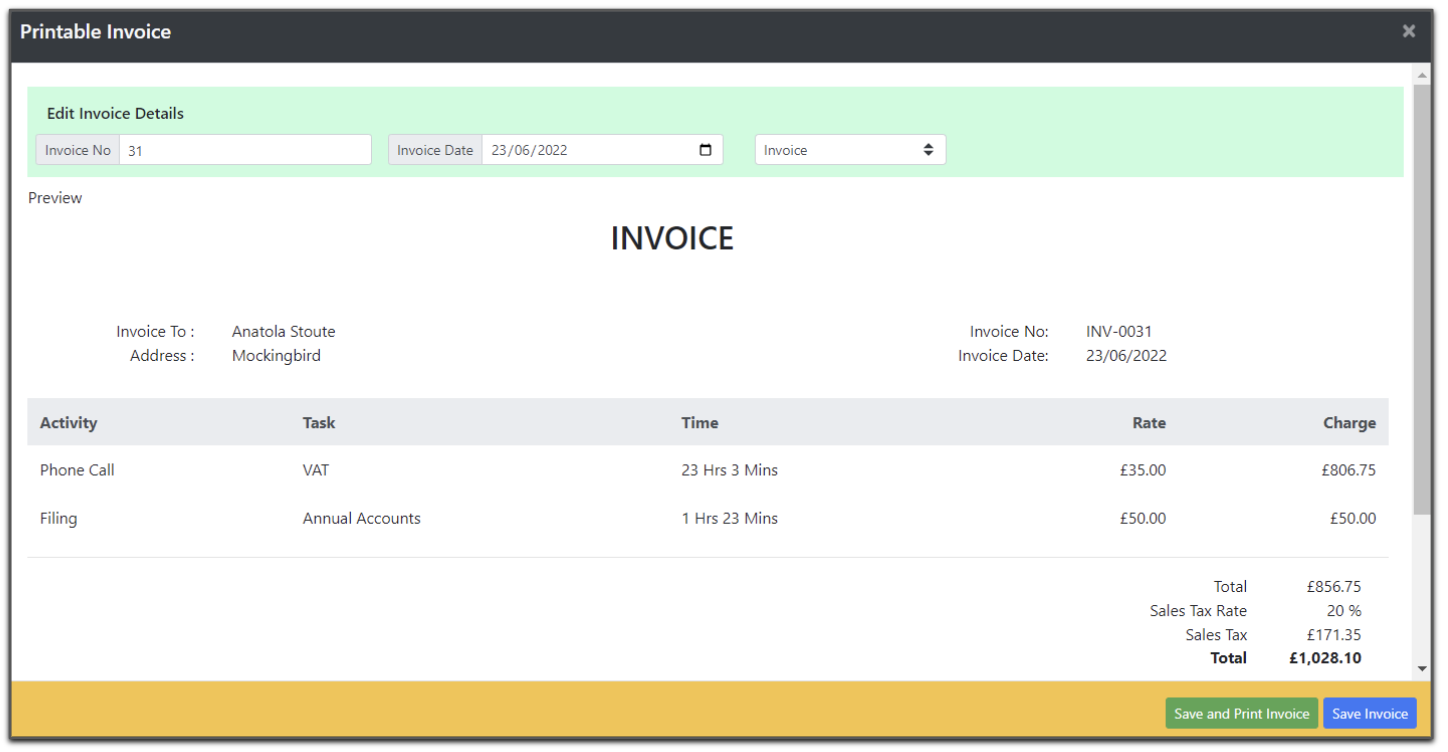
STEP 6: TIMESHEET INVOICING
To raise an invoice for the tasks awaiting invoicing, simply filter on the Client and click ‘Generate Invoice’. Users can then print and save the invoice before sending to the client.


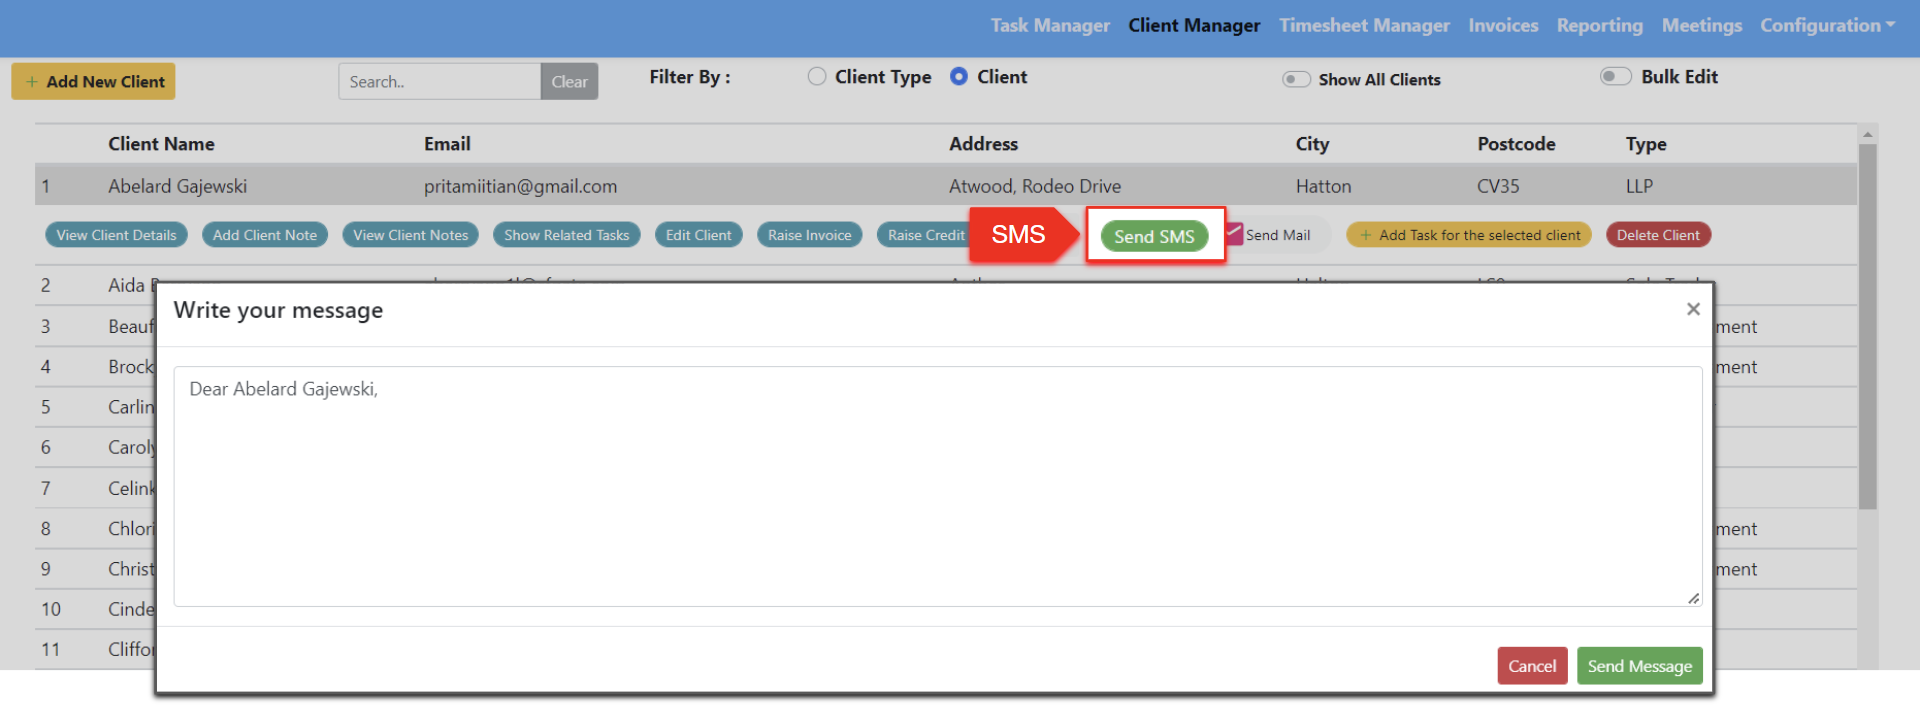
STEP 7: USING BUILT-IN MAIL-MERGE, WHATSAPP & SMS
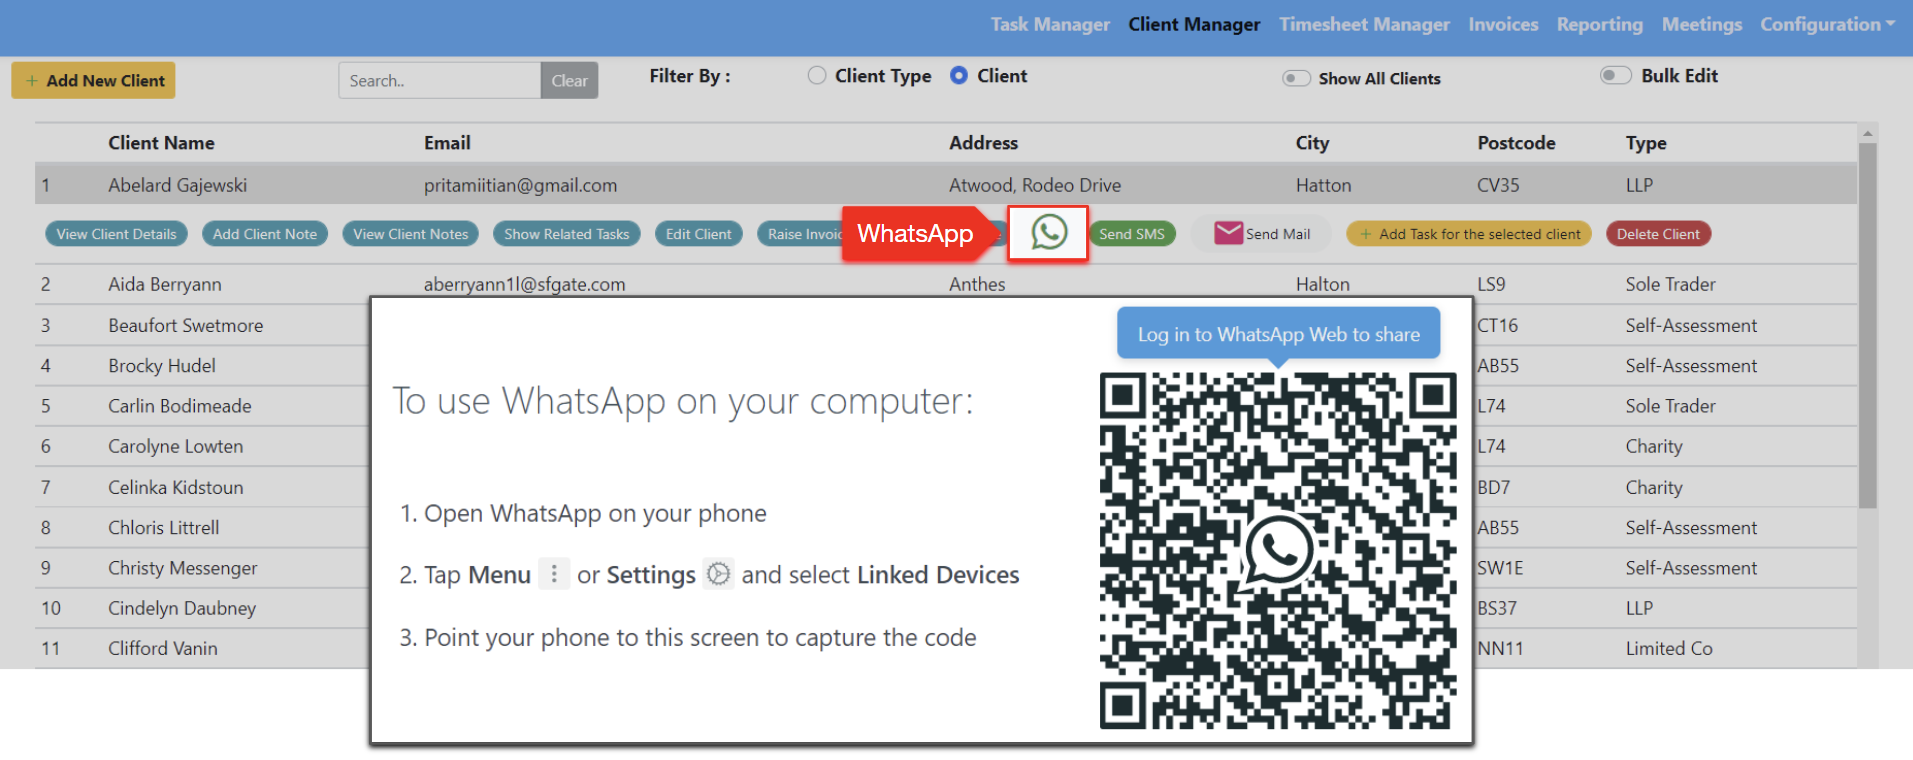
Users can click the WhatsApp icon to begin a browser-based WhatsApp conversation with the client. A new browser with WhatsApp web chat will open and the user can start typing. If WhatsApp is launched from the Task Manager sheet it will pre-populate with information regarding the task in question. There is no cost to the user for this functionality.

WhatsApp has grown in popularity over the years as a mainstream business communications channel, primarily because there is less spam compared to email, but also because it is likely to elicit a quicker response from the client. With WhatsApp users will be able to:
- Send documents, photos & screenshots (quotations, invoices, final accounts, etc.)
- Leave voice recordings and do voice and video calls
Please note that WhatsApp Desktop Application must be installed on your PC/Laptop. When enabling WhatsApp webchat for the first time a one-off QR code will be generated which users will need to scan with their phone in order to link it with their device. Once the browser has been authorized for WhatsApp use, the user won’t need to complete this authorisation step again.
SMS functionality is also included in the App, but users will need to make contact with us in order for their app to be configured to send SMS messages. In addition, users will need to buy an SMS bundle as 3rd Party Providers provide the text messaging functionality and charge for this service.

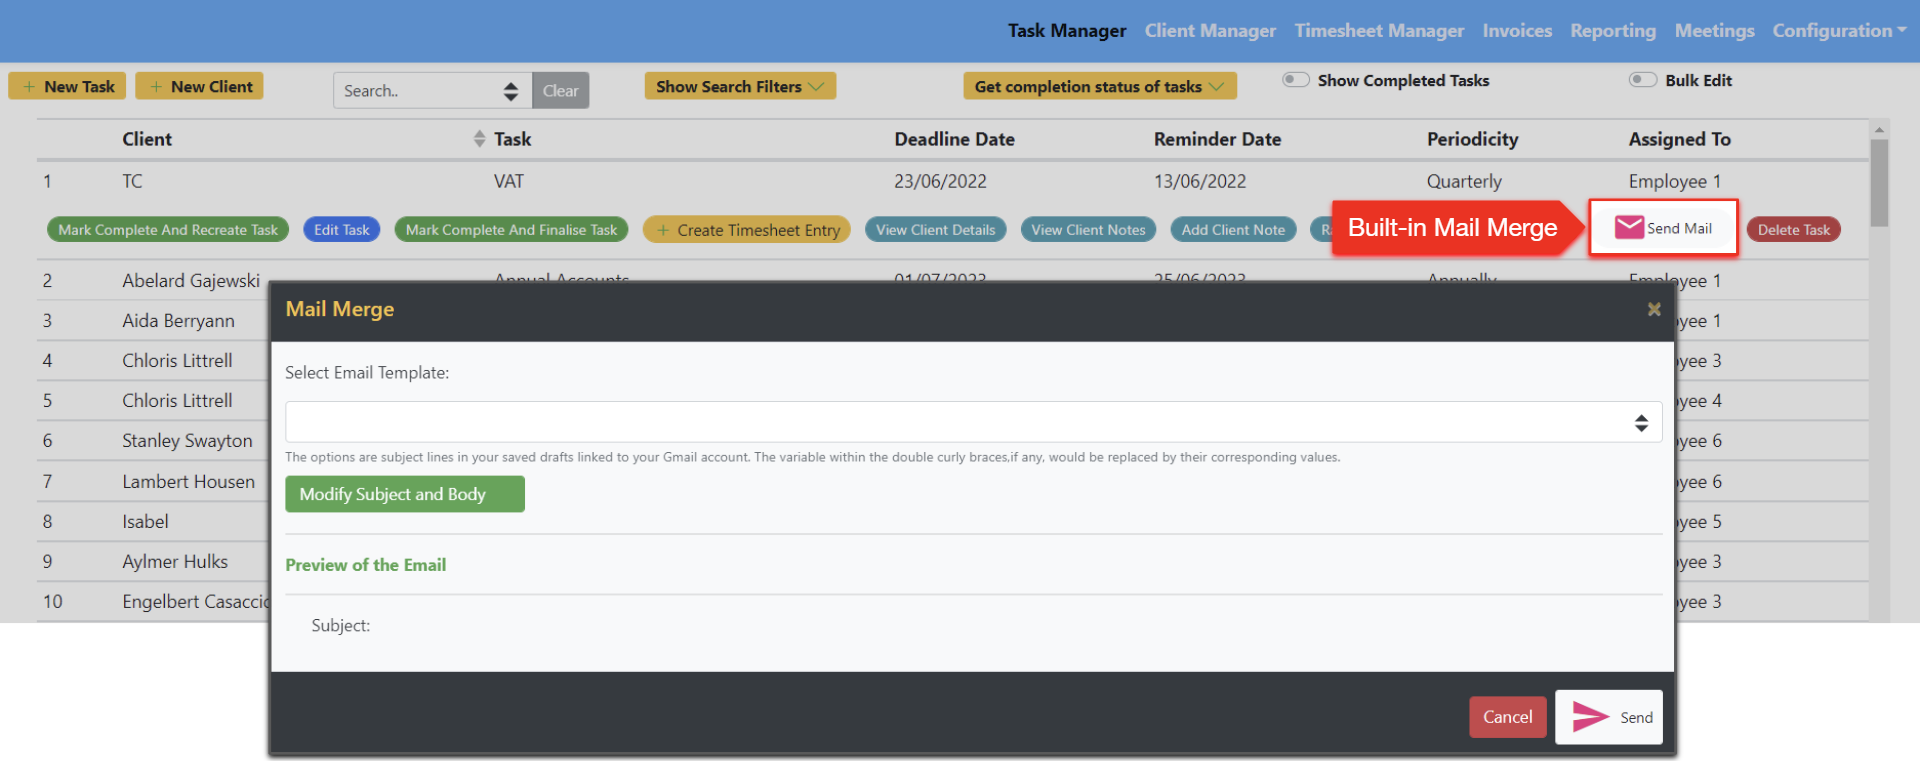
Built-in Mail-Merge allows users to send emails to clients individually or as a bulk send. Clicking ‘Send Mail’ brings up a form which allows the user to select a Template. Templates are draft emails which the user creates and stores in the Draft Folder of their Gmail account. Users can also modify the subject and body of the email whilst they are composing it.
The email can then be previewed before sending:

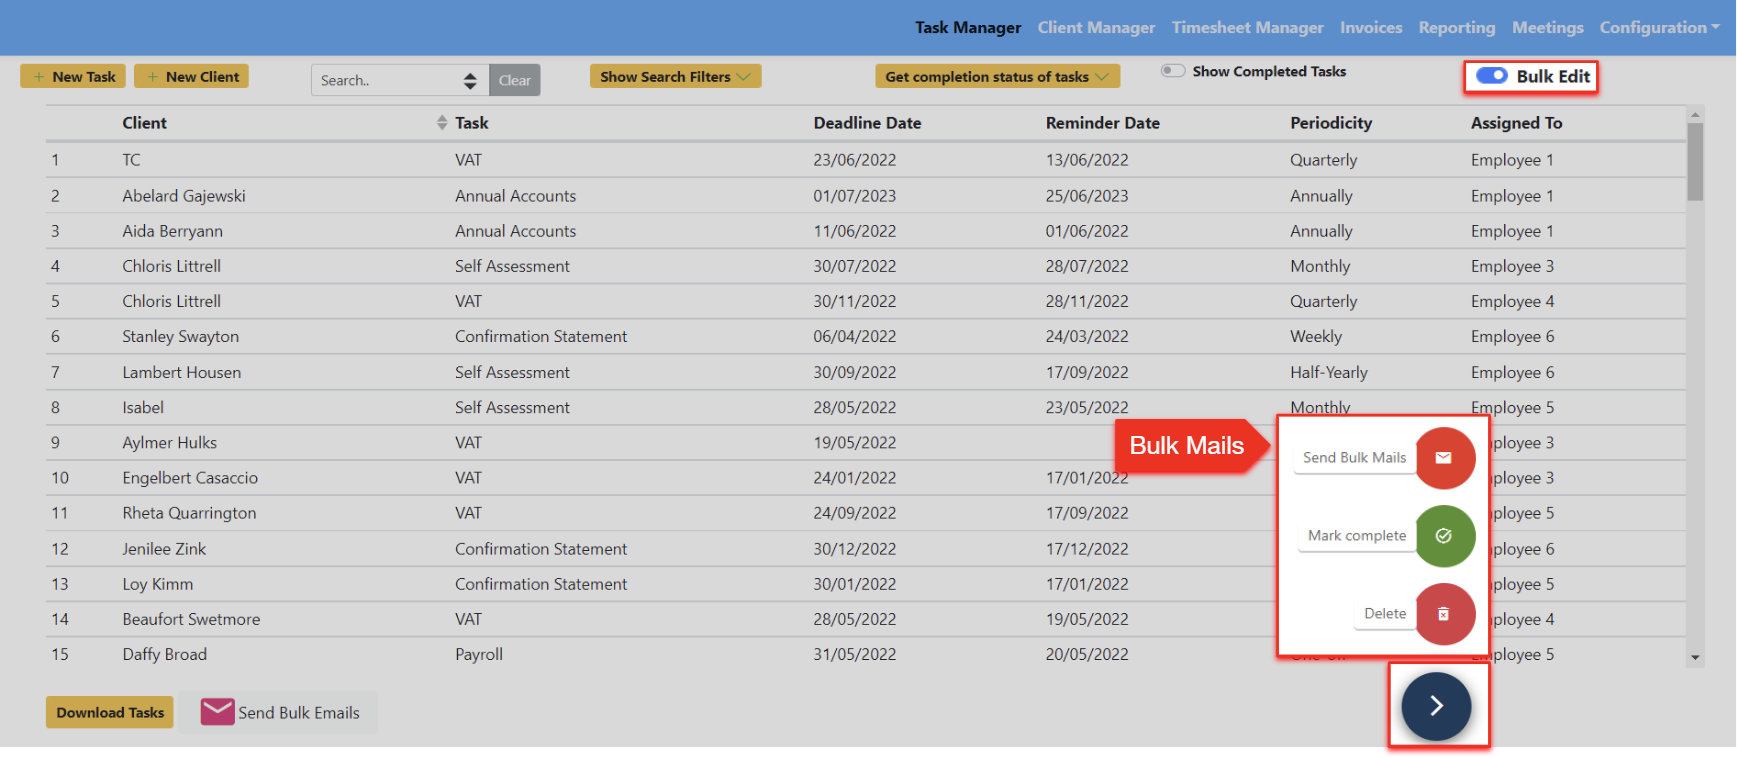
To send Bulk emails, users need to select ‘Bulk Edit’ in the top right-hand corner, then select intended multiple recipients and then use the blue toggle button at the bottom to Send an email:

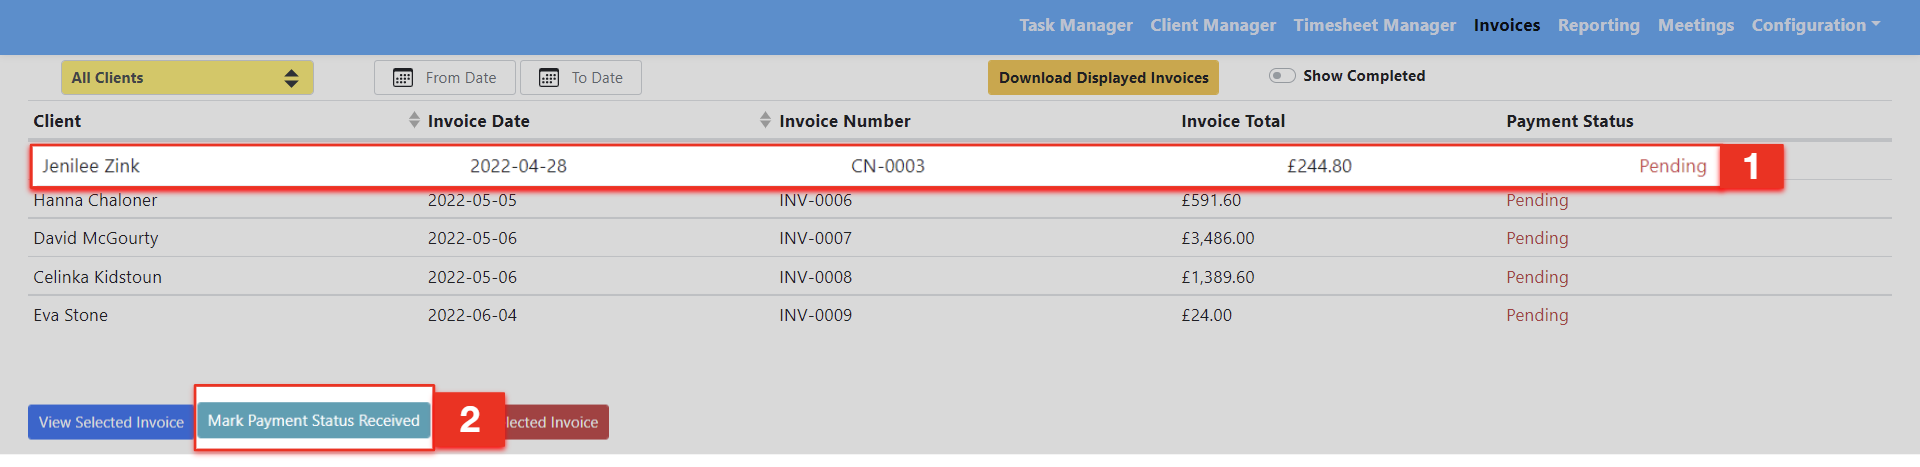
STEP 8: INVOICING
Users can see a list of all invoices and mark their status according to whether the invoice has been paid or is still outstanding. Users can also set the payment status Received or Pending by simply clicking on the ‘Client’ >‘Mark Payment Status Pending/Received’

STEP 9: REPORTING
Users can filter the list of completed/pending tasks under Reporting on the Navigation Menu.

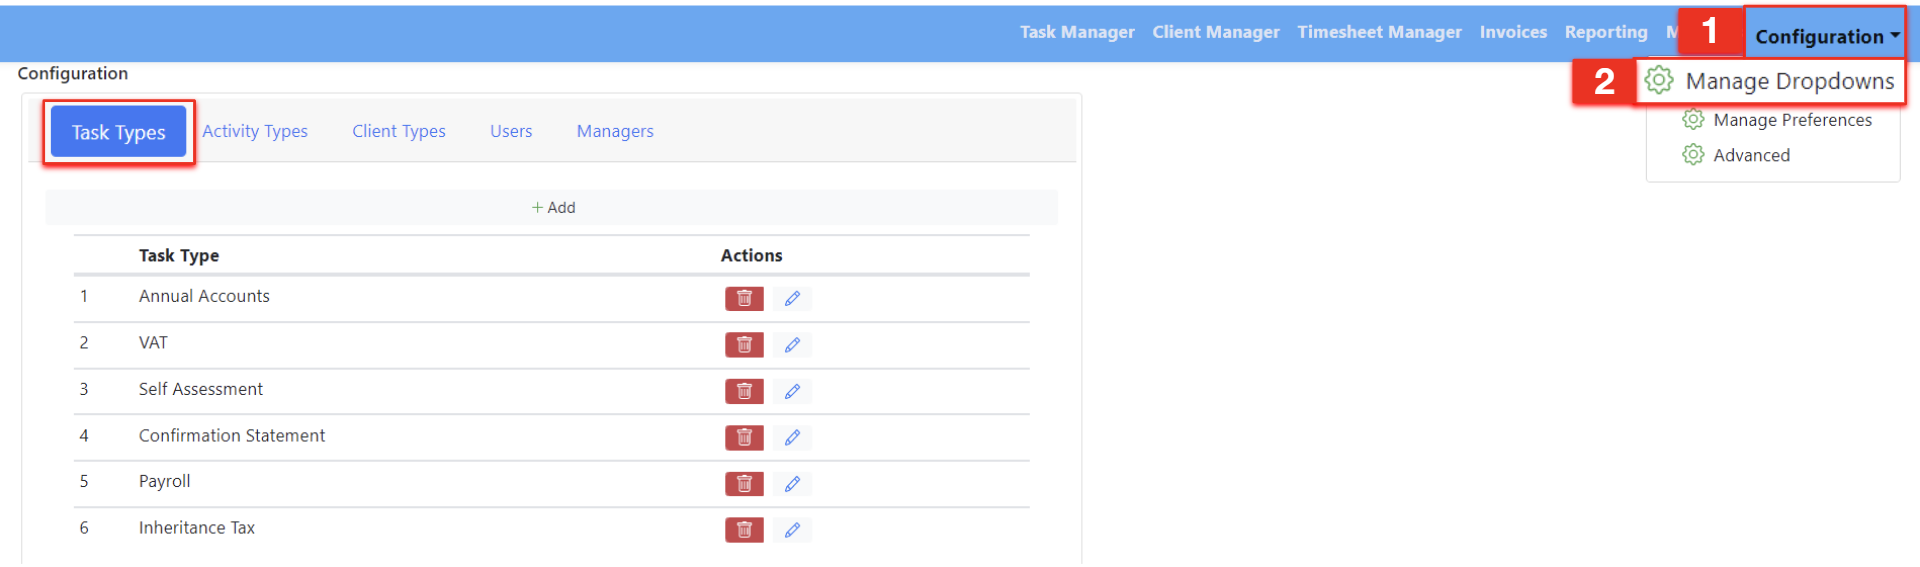
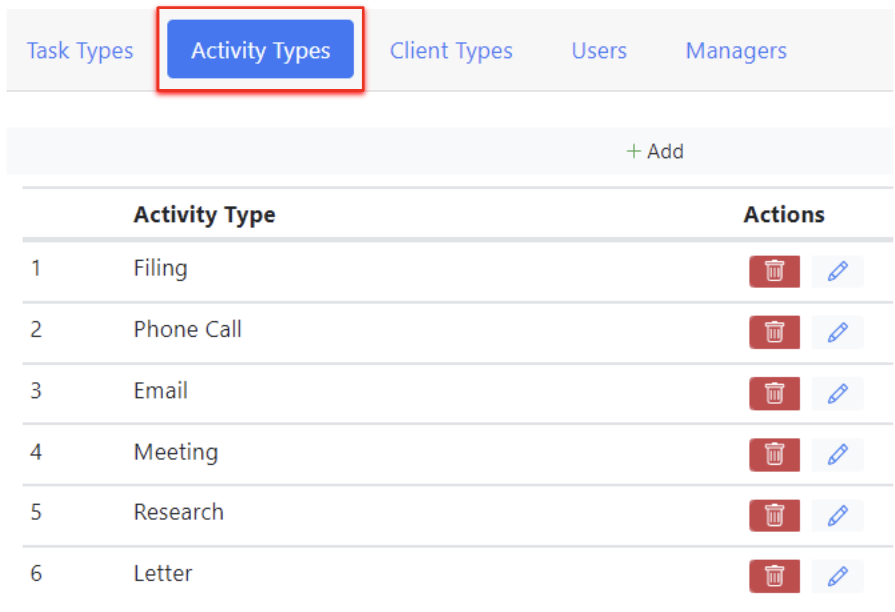
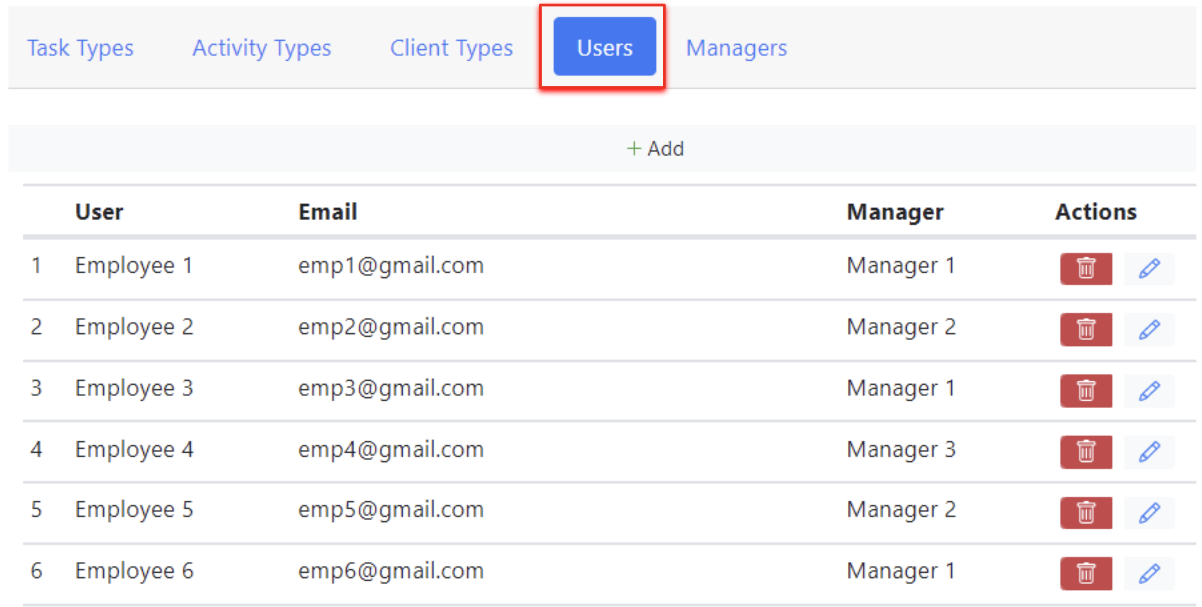
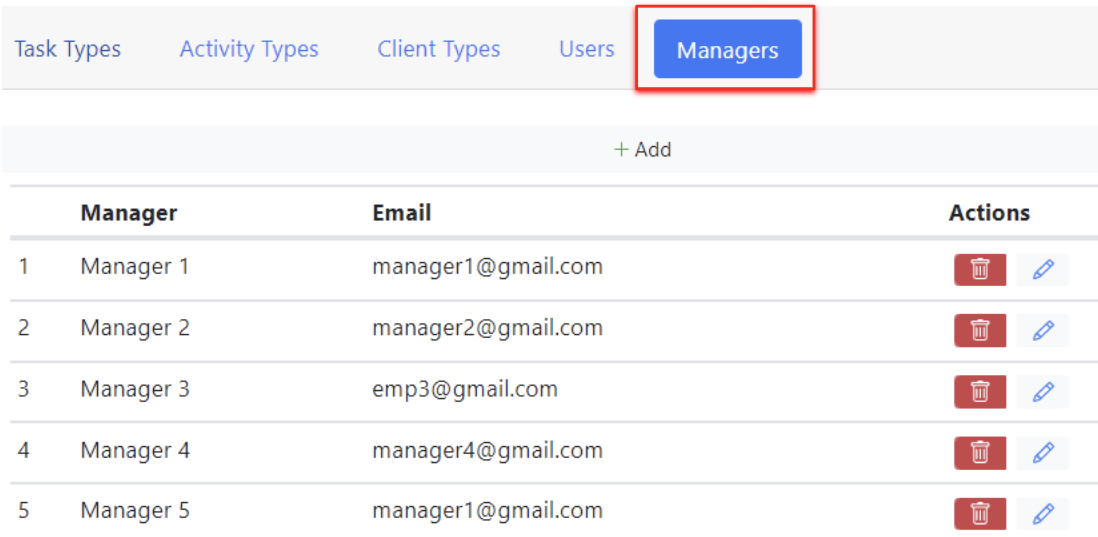
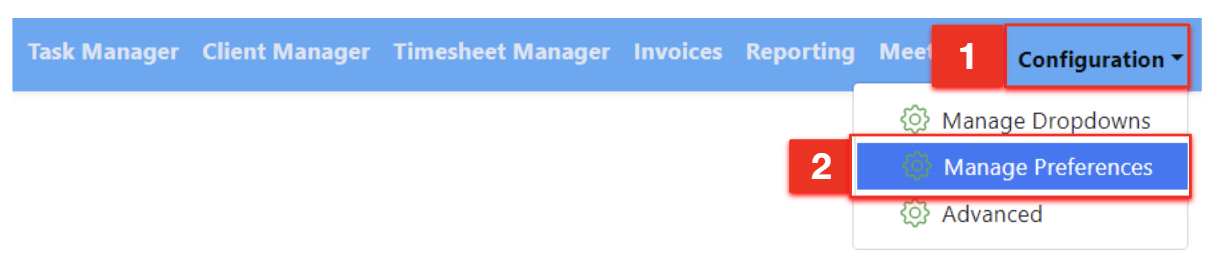
STEP 10a: CONFIGURATION – MANAGE DROPDOWNS
Edit or delete the information which appears in the App depending on: Task Types, Activity Types, Client Types, Users, and Managers.


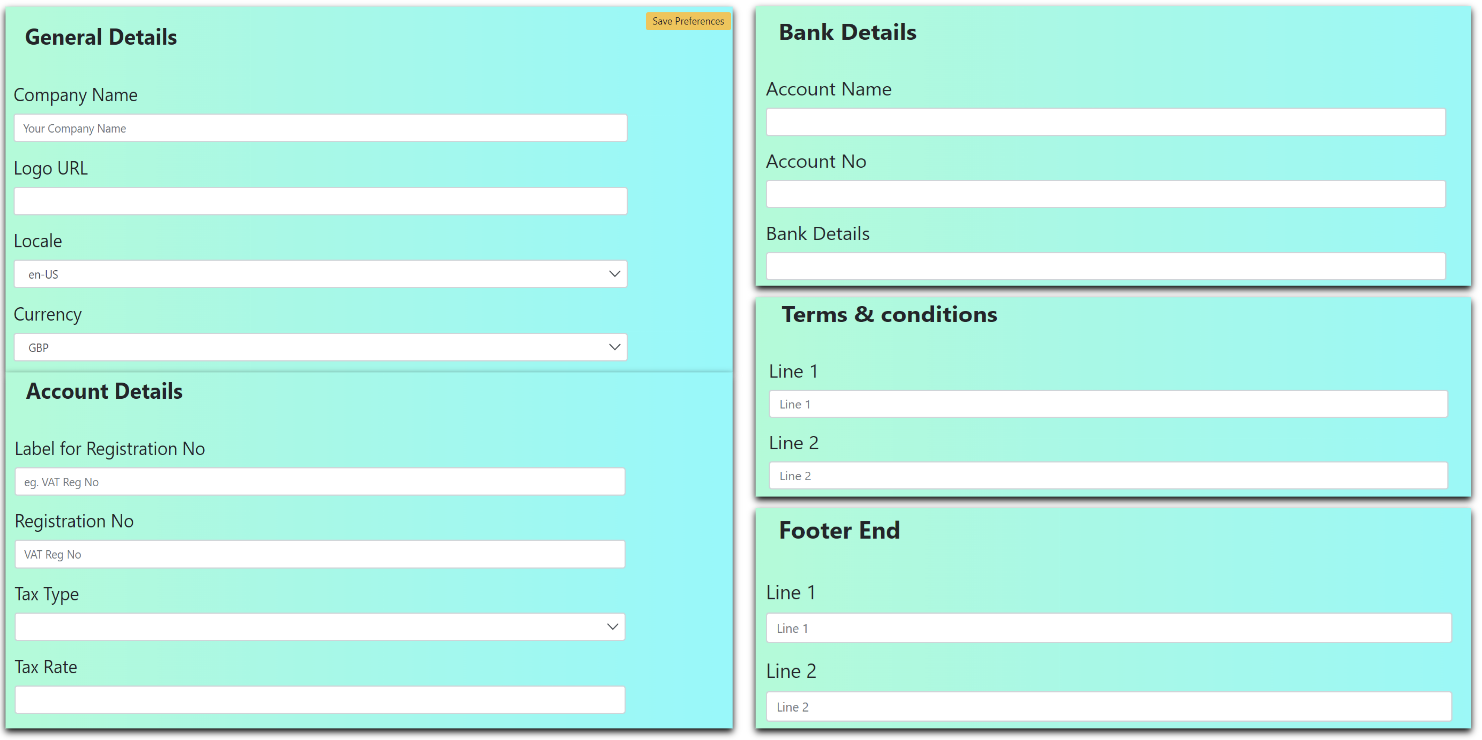
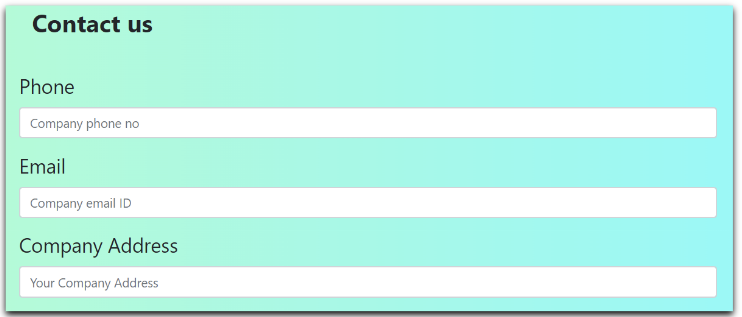
STEP 10b: CONFIGURATION – MANAGE PREFERENCES
Users can customize the appearance of their printed invoices by adding their own company logo, contact information, billing account, currency, and terms and conditions.


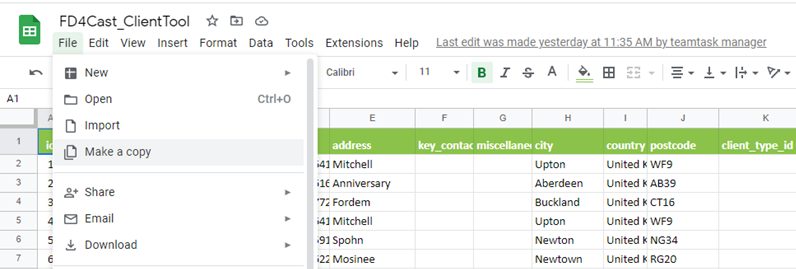
Users will need to enter their product key once purchased. All demo records should be cleared first to provide a clean start. Users can also bulk upload their client list. This is done by first downloading the pre-configured template and then populating it with client details before uploading.

STEP 11: HOW TO DEPLOY THE APP FOR TRIAL USE
Deployment for Single & Multi-User
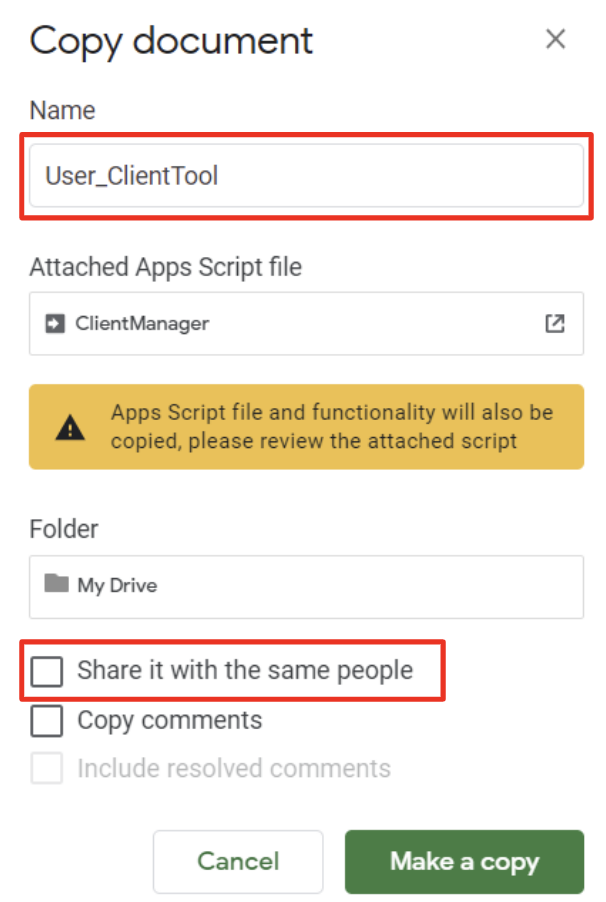
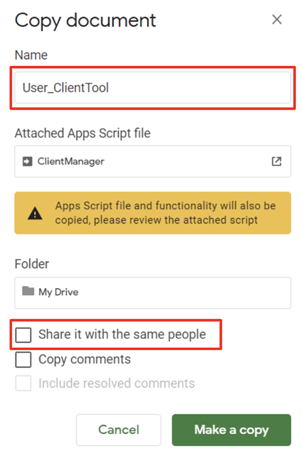
- Make a copy of Master Google Sheet, rename to a different name and make sure you do not share it with the same people (i.e. leave the highlighted option to share unticked)

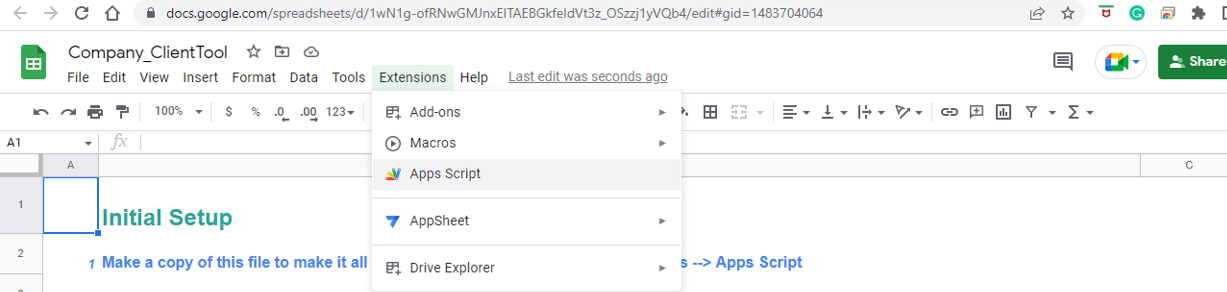
- Once you have made a copy go to Extensions > Apps Script.

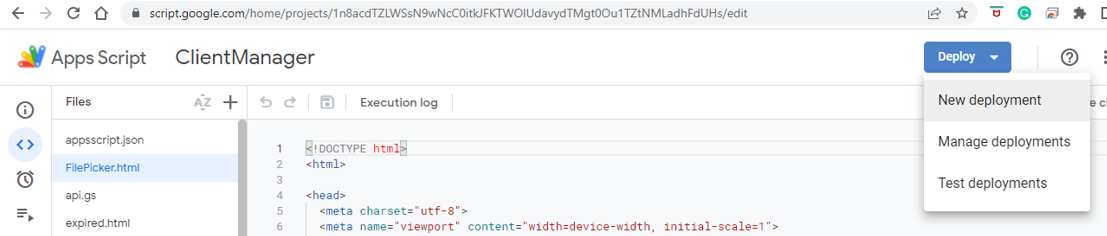
- In Apps Script select Deploy > New Deployment.

FOR SINGLE USERS
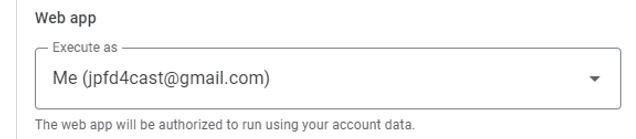
In New Deployment please ensure that for the ‘Web app’ you execute as “Me (your Gmail Address)” and for ‘Who has access’ you select “Only myself”


FOR MULTI-USERS:
In New Deployment please ensure that for the ‘Web app’ you execute as “User accessing the web app” and for ‘Who has access’ you select “Anyone with Google account”


Copy the link and paste it in a new browser.

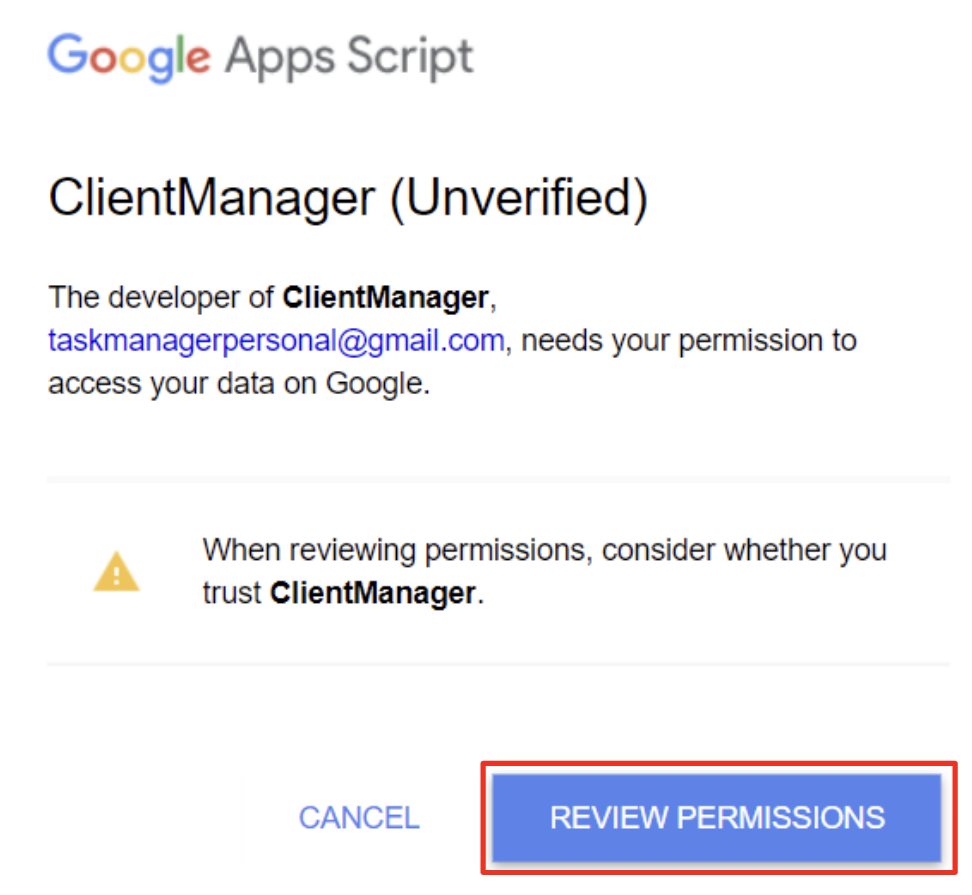
A warning similar to the screenshot will appear. Now click on ‘Review Permissions’

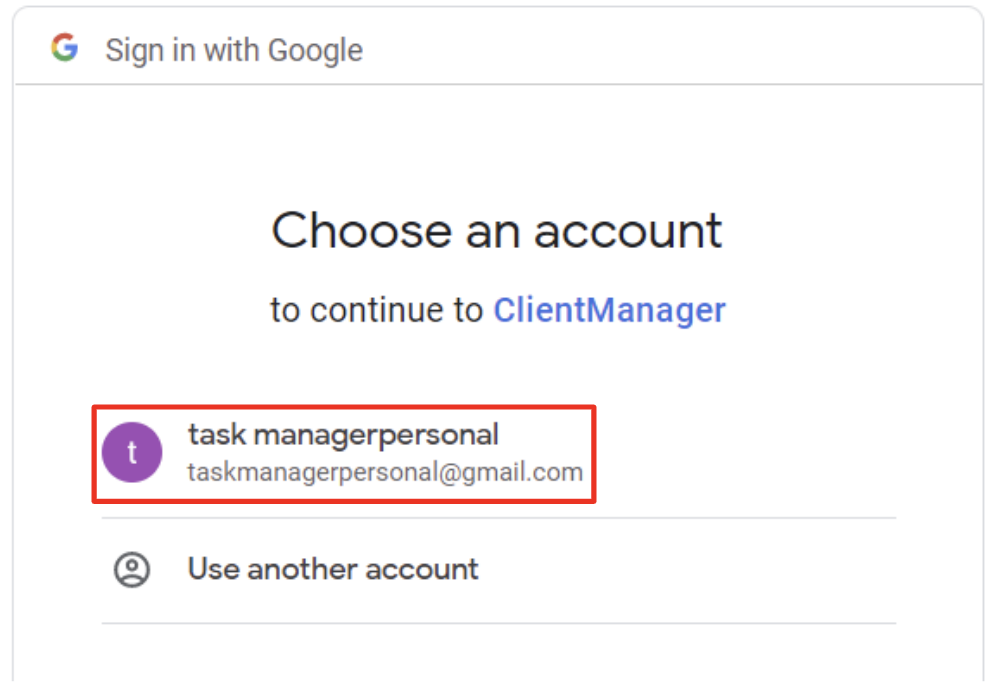
Choose an account to verify it with:

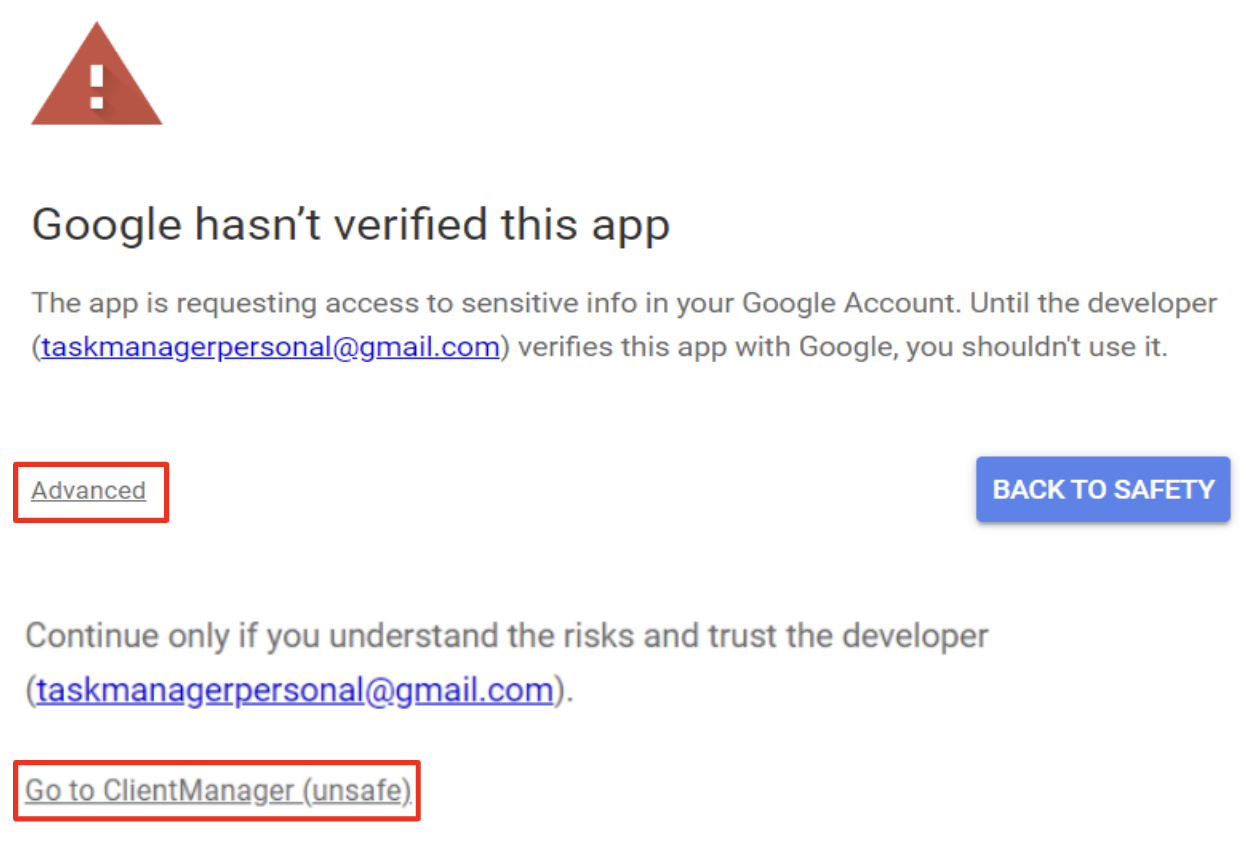
Click on ‘Advanced’ then ‘Go to ClientManager’

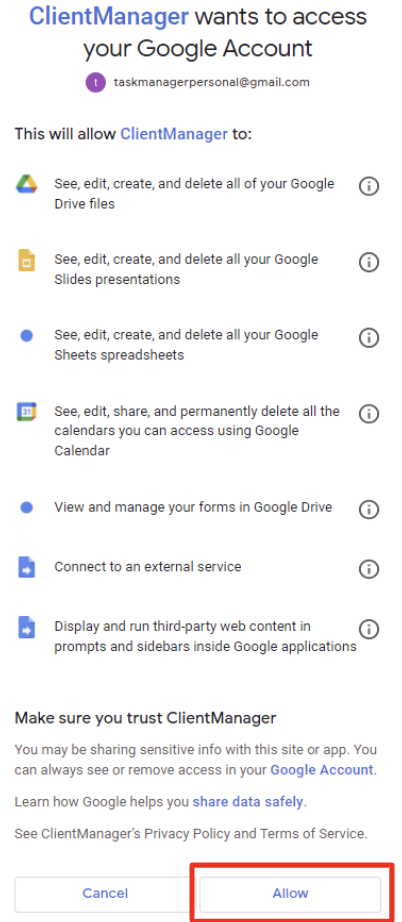
After clicking on ‘Go to ClientManager’, you will receive a notification that you’re allowing the app to do the following: Click on ‘Allow’

You’ll see a message that the Authorization is successful, the FD4Cast Client Task Manager App will launch and you’re all set. If you have a team, you can now invite those users by adding them as employees and/or managers. Rest assured that only users whom you have added will be able to view and modify the data: